Unpack a Tryll release, drop the package into your Unity project (the
server is bundled inside it), configure one project setting, download a
model through the Model Manager, and watch a single Generate node print
its answer to the Console during Play Mode — no chat UI required.
Working with an AI coding agent?
The Unity package ships an AGENTS.md at its root. Attach it to your agent's
context (Claude Code, Cursor, Copilot, Codex, …) before asking it to write Tryll code —
it carries the graph/slot mental model and the ways Tryll differs from a cloud LLM SDK.
Agents that fetch docs themselves can start from
llms.txt.
A scene with a TryllAgentComponent on a GameObject that, on Start,
connects to a locally-spawned Tryll server and creates a one-node agent.
You trigger the first inference by right-clicking the component in the
Inspector (Context Menu → Ask Tryll), and the answer streams into the
Unity Console.
Download tryll-unity-<version>.7z from the releases page and extract
it somewhere temporary (e.g. C:\Downloads\tryll\).
Inside is the Unity package — the server is bundled inside it, so
there is nothing else to install:
UnityPlugin/                       <-- the UPM package (everything you need)
├── package.json
├── Runtime/
├── Editor/
└── .Server/Default/               <-- bundled server (rides inside the package)
    ├── tryll_server.exe
    ├── llama.dll, ggml*.dll, ggml-vulkan.dll
    └── data/
        ├── server-config.json
        ├── models.json
        ├── default-canned-responses.txt
        └── default-guardrail-patterns.txt
The archive ships no model weights — you download the models your
graph references up front through the Model Manager (Step 4). CreateAgent
fails fast if a referenced model is not already on disk; the server does
not download it for you at agent-creation time. In Client Dev, downloaded
weights land under <Project>/TryllStorage/models/.
Copy the UnityPlugin/ folder into your project's Packages/ directory
and name it com.tryll.client. Unity auto-discovers embedded packages
there, so there is no manifest.json edit to make:
After the import, the Welcome to Tryll window opens. You can also open
it from Window → Tryll → Welcome. It has two setup steps:
Licence. Click Accept licence. The editor starts the server only
after you accept the Tryll Runtime Licence. The licence includes
telemetry, which is always on in the editor. The game you ship sends no
telemetry. Telemetry opens the
Telemetry page. Read the licence shows
the full text from the package's LICENSE.md.
Server. This package bundles its server, so this step is done as soon
as you accept.
The setup line reads 2 of 2 done. Withdraw takes the acceptance back
and stops the editor's server.
Keep the package embedded here (a writable folder) rather than in a
read-only cache. Model downloads and authored storage files live under
<Project>/TryllStorage/, not inside the package.
Add this to .gitignore if you do not want models in source control
(committing them is optional):
/TryllStorage/models/
Nothing else to copy
The server binary and its data/ ride inside the package's
.Server/Default/ folder, so installing the package installs the
server too — one folder to drop in, one to update on a new release.
Step 3 — Configure Tryll Client in Project Settings
Open Edit → Project Settings → Tryll Client and set:
Setting
Value
Why
Auto Launch Server
true (default)
TryllClient spawns the bundled server automatically. Uncheck to run a server yourself.
Llama.cpp backend
Vulkan (default)
Portable GPU API. Set Auto to prefer CUDA on NVIDIA (also ships CUDA DLLs in a player build).
Game Name
e.g. my-game
Human project label. Sent as the session name and as --project-name. Telemetry groups by a hidden project id; see Telemetry.
Telemetry Level
Basic (default)
Turns or Full send more while debugging. Takes effect the next time the editor launches the server.
Storage Data Folder
TryllStorage (default)
Project folder outsideAssets/. The editor launches the server with --storage-root here.
There is no server-path setting — the location is resolved from the
package automatically, identically in the Editor and in packaged builds.
The editor sends content-free telemetry at the basic level. To send turn
timings or conversation text while debugging, see
Telemetry. Packaged players send nothing.
Settings are saved to Assets/Resources/TryllRuntimeSettings.asset
(created on first access).
Models must be registered before use
CreateAgent fails fast if a referenced model is not already on disk —
the server does not download it for you. Continue to Step 4 to download
and register a model via the editor Model Manager before running the
graph below.
Model name fields in the Inspector are dropdown lists populated from
the models you have registered in this project. On a fresh installation
those dropdowns are empty — you must open the Model Manager, download a
model, and register it before it appears.
Open Window → Tryll → Model Manager.
The window launches the bundled server, connects, and lists every
model the server knows about. Wait for the status indicator in the
toolbar to show ● Ready.
In the model list, find a language model to start with. Recommended:Gemma 3 4B Instruct (Q4_K_M) (~3 GB download). Smaller / quicker:Llama 3.2 3B Instruct (Q4_K_M) (~2 GB download).
Click the model row to select it. In the Model properties panel on
the right:
Status shows Absent — the files are not on disk yet.
Click Download. A progress bar appears and the toolbar shows
active download count.
Once the status changes to Downloaded, set the Build
registration to Experimental (usable in the editor, excluded
from packaged builds) or Production (shipped in builds).
For this tutorial, Experimental is fine.
Close the Model Manager.
The Model Manager writes a TryllModelManifest asset to
Assets/Resources/TryllModelManifest.asset. Any Model Name dropdown in the
Inspector now lists the models you registered here.
Registration controls build inclusion
Experimental models are available during development but stripped
by the build post-processor when you build a player. Production
models are staged into the Server/ folder next to the player
executable. A model that is downloaded but unregistered (status
None) is invisible to the build system.
Step 5 — Create a workflow asset and set up the scene
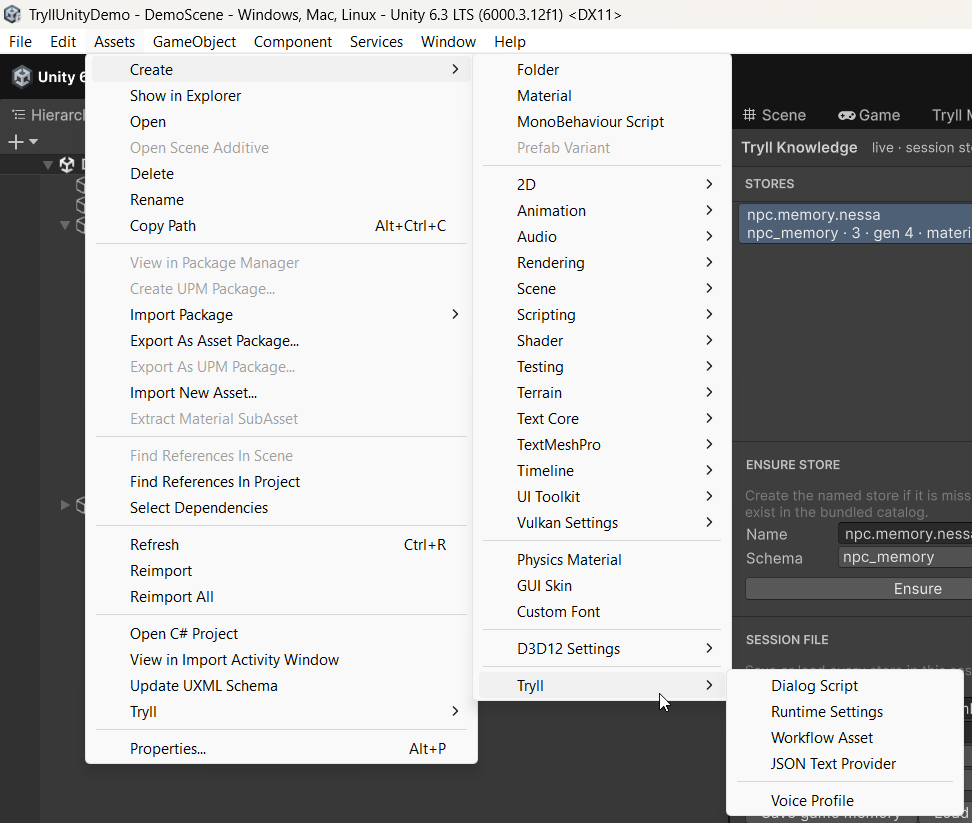
In the Project window, right-click → Create → Tryll → Workflow
Asset. Name it DemoWorkflow.
The Create → Tryll submenu (the same menu as Assets → Create → Tryll).
2. Select DemoWorkflow. In the Inspector, expand Graph:
- Under Nodes, click + to add one entry.
- Set Name = answer.
- Click the Params type picker (shows <null> by default) and
select Generate from the dropdown. The node's parameter
fields expand below it — leave them all at their defaults; the
Default Exit field stays empty, which routes the turn to END.
- Set Start Node = answer.
- Set Default Model Name using the dropdown — it now lists the
models you registered in the Model Manager. Pick the one you
downloaded in Step 4.
3. Create a new empty GameObject — call it TryllDemo.
4. Add a Tryll Agent Component (Add Component → Tryll → Tryll Agent
Component).
5. Assign DemoWorkflow to the component's Workflow Asset field.
6. Un-check Auto Create On Connect — this tutorial wires the
lifecycle explicitly so you control exactly when the agent is created.
7. Create a C# script TryllDemo.cs and attach it to the same
GameObject:
usingUnityEngine;usingTryll.Client;publicclassTryllDemo:MonoBehaviour{privateTryllAgentComponent_agent;voidStart(){_agent=GetComponent<TryllAgentComponent>();_agent.OnAnswerText.AddListener((nodeName,text,isDelta,isFinal)=>{// Send = Streamed: every chunk is a delta, and the last one is an// empty terminator with isFinal = true.// Send = Whole: one chunk with isDelta = false and the full text.if(!string.IsNullOrEmpty(text))Debug.Log($"[Tryll] {(isDelta ? "delta" : "reply")} from {nodeName}: {text}");if(isFinal)Debug.Log($"[Tryll] {nodeName} finished its answer");});_agent.OnTurnComplete.AddListener((status,debugInfo,tokens)=>Debug.Log($"[Tryll] turn complete — status={status} tokens={tokens}"));_agent.OnError.AddListener(error=>Debug.LogError($"[Tryll] error: {error}"));_agent.OnAgentCreated.AddListener(()=>Debug.Log("[Tryll] agent ready — right-click this component and choose 'Ask Tryll'"));varclient=TryllClient.Instance;client.CreateSessionComplete+=err=>{if(!err.IsOk){Debug.LogError($"[Tryll] CreateSession failed: {err}");return;}_agent.CreateAgent();};client.StartSession();}[ContextMenu("Ask Tryll")]voidAskTryll(){if(!_agent.HasAgent){Debug.LogWarning("[Tryll] agent not ready yet");return;}_agent.SendMessage("In one sentence: what is Tryll?");}}
A brief pause while the server starts and the client connects.
The model loads from disk (a few seconds the first time it is used
in a session) — this only works because you already downloaded and
registered it in Step 4; CreateAgent fails fast otherwise.
The Console prints: [Tryll] agent ready — right-click this component and choose 'Ask Tryll'.
Once the agent is ready:
In the Hierarchy, select the TryllDemo GameObject.
In the Inspector, right-click the TryllDemo script component
header and choose Ask Tryll.
Watch the Console — answer deltas stream in as
[Tryll] delta from answer: … lines, then
[Tryll] answer finished its answer and [Tryll] turn complete.
tryll_server.exe stdout (re-emitted by the client)
[Listener] Listening on 127.0.0.1:<port> (in the editor, auto-launch binds loopback on the Server Port project setting, default 9100, and falls back to a free port only if that port is taken; player builds always pick a free port), model load lines, server errors.
Client Dev writes one log file per run under
%LOCALAPPDATA%\Tryll\projects\<project-key>\logs\ (project key from the
sanitized game name plus a hash of the project directory).
A session connected to a Tryll server the client spawned for you.
One agent with a one-node graph authored in the DemoWorkflow Workflow
Asset (Generate node, driven by a model you downloaded and registered
in the Model Manager).
Model output surfaced as OnAnswerText events, which stream token-by-token
by default (Send = Streamed on the Generate node); set Send = Whole
for a single full-reply frame instead of delta chunks.
A [ContextMenu] method as the simplest way to trigger a turn from
the Inspector without any UI setup.
Compile errors on import — check that the package's
Runtime/Generated/ folder contains .cs files. If it's empty, the
distribution was packaged without the FlatBuffers step; contact support
or re-download.
"Accept the Tryll Runtime Licence in the Tryll Welcome window first." —
the editor did not start the server because the licence is not accepted.
The Welcome window opens. Click Accept licence, then try again (for
example, click Start again in the Chat window).
[TryllServer] server not found — the package's
.Server/Default/ folder is missing or empty. A release package ships
it populated; if you cloned the repo instead, build the Tryll server so
the committed .Server/Default symlink resolves to your build.
Model name dropdown is empty — open the Model Manager
(Window → Tryll → Model Manager), download a model, and set its
build registration to Experimental or Production. Unregistered
models do not appear in Inspector dropdowns.
Stuck at connecting — the server crashed or didn't start in time.
Check the Console for [TryllServer] lines and the Client Dev log under
%LOCALAPPDATA%\Tryll\projects\<project-key>\logs\ as a fallback.
CreateSession fails — usually a server-side error reading
models.json or initialising the inference engine. Check
[TryllServer] Console output.
OnError fires during CreateAgent — read the error message.
Common causes: Default Model Name is empty or doesn't match any
entry in models.json (fails fast — download it via the Model Manager
first), or a route targets a node that doesn't exist.
Right-clicking the script shows no Ask Tryll option — you must be
in Play Mode with the agent already created. Check the Console for the
agent ready log line first.
Nothing appears in the Console — confirm OnAnswerText is wired
in Start() and that the script is attached to the same GameObject as
TryllAgentComponent. With the default Send = Streamed on the
Generate node, OnAnswerText fires once per chunk (isDelta = true),
the last call is an empty terminator (text is empty, isFinal = true),
and OnTurnComplete follows. Set Send = Whole to get a single
full-reply frame (isDelta = false, isFinal = true).